


How to Install WordPress Locally Step by Step

Differences between WordPress.org and WordPress.com 🤔
Although they share the same name, WordPress.org and WordPress.com are not the same. It is important to understand their differences before starting to work with WordPress.
🔹 WordPress.org → Self-hosted WordPress 🧑💻
This is the free, professional, and most widely used version of WordPress.
- ✅ You download the WordPress software for free
- ✅ You need your own hosting and domain
- ✅ You have full control over your website
- ✅ You can install any plugins and themes you want
- ✅ Ideal for professional projects and serious websites
🔹 WordPress.com → WordPress as a service ☁️
It is a platform that offers WordPress already hosted.
- ❌ No download required, it is a service hosted on wordpress.com
- ❌ You do not need your own hosting
- ❌ The free version has many limitations
- ❌ Plugins are only available on higher paid plans
- ❌ Suitable only for very simple personal blogs
👉 Conclusion: to learn and work properly with WordPress, we will always use WordPress.org.
1️⃣ Where to download WordPress to install it locally 📥
We must go directly to the official WordPress website:
👉 https://wordpress.org/download/
From there, download the .zip file of the latest WordPress version.
💡 Tip: if you don’t remember the URL, you can search on Qwant for “Download WordPress.org”.
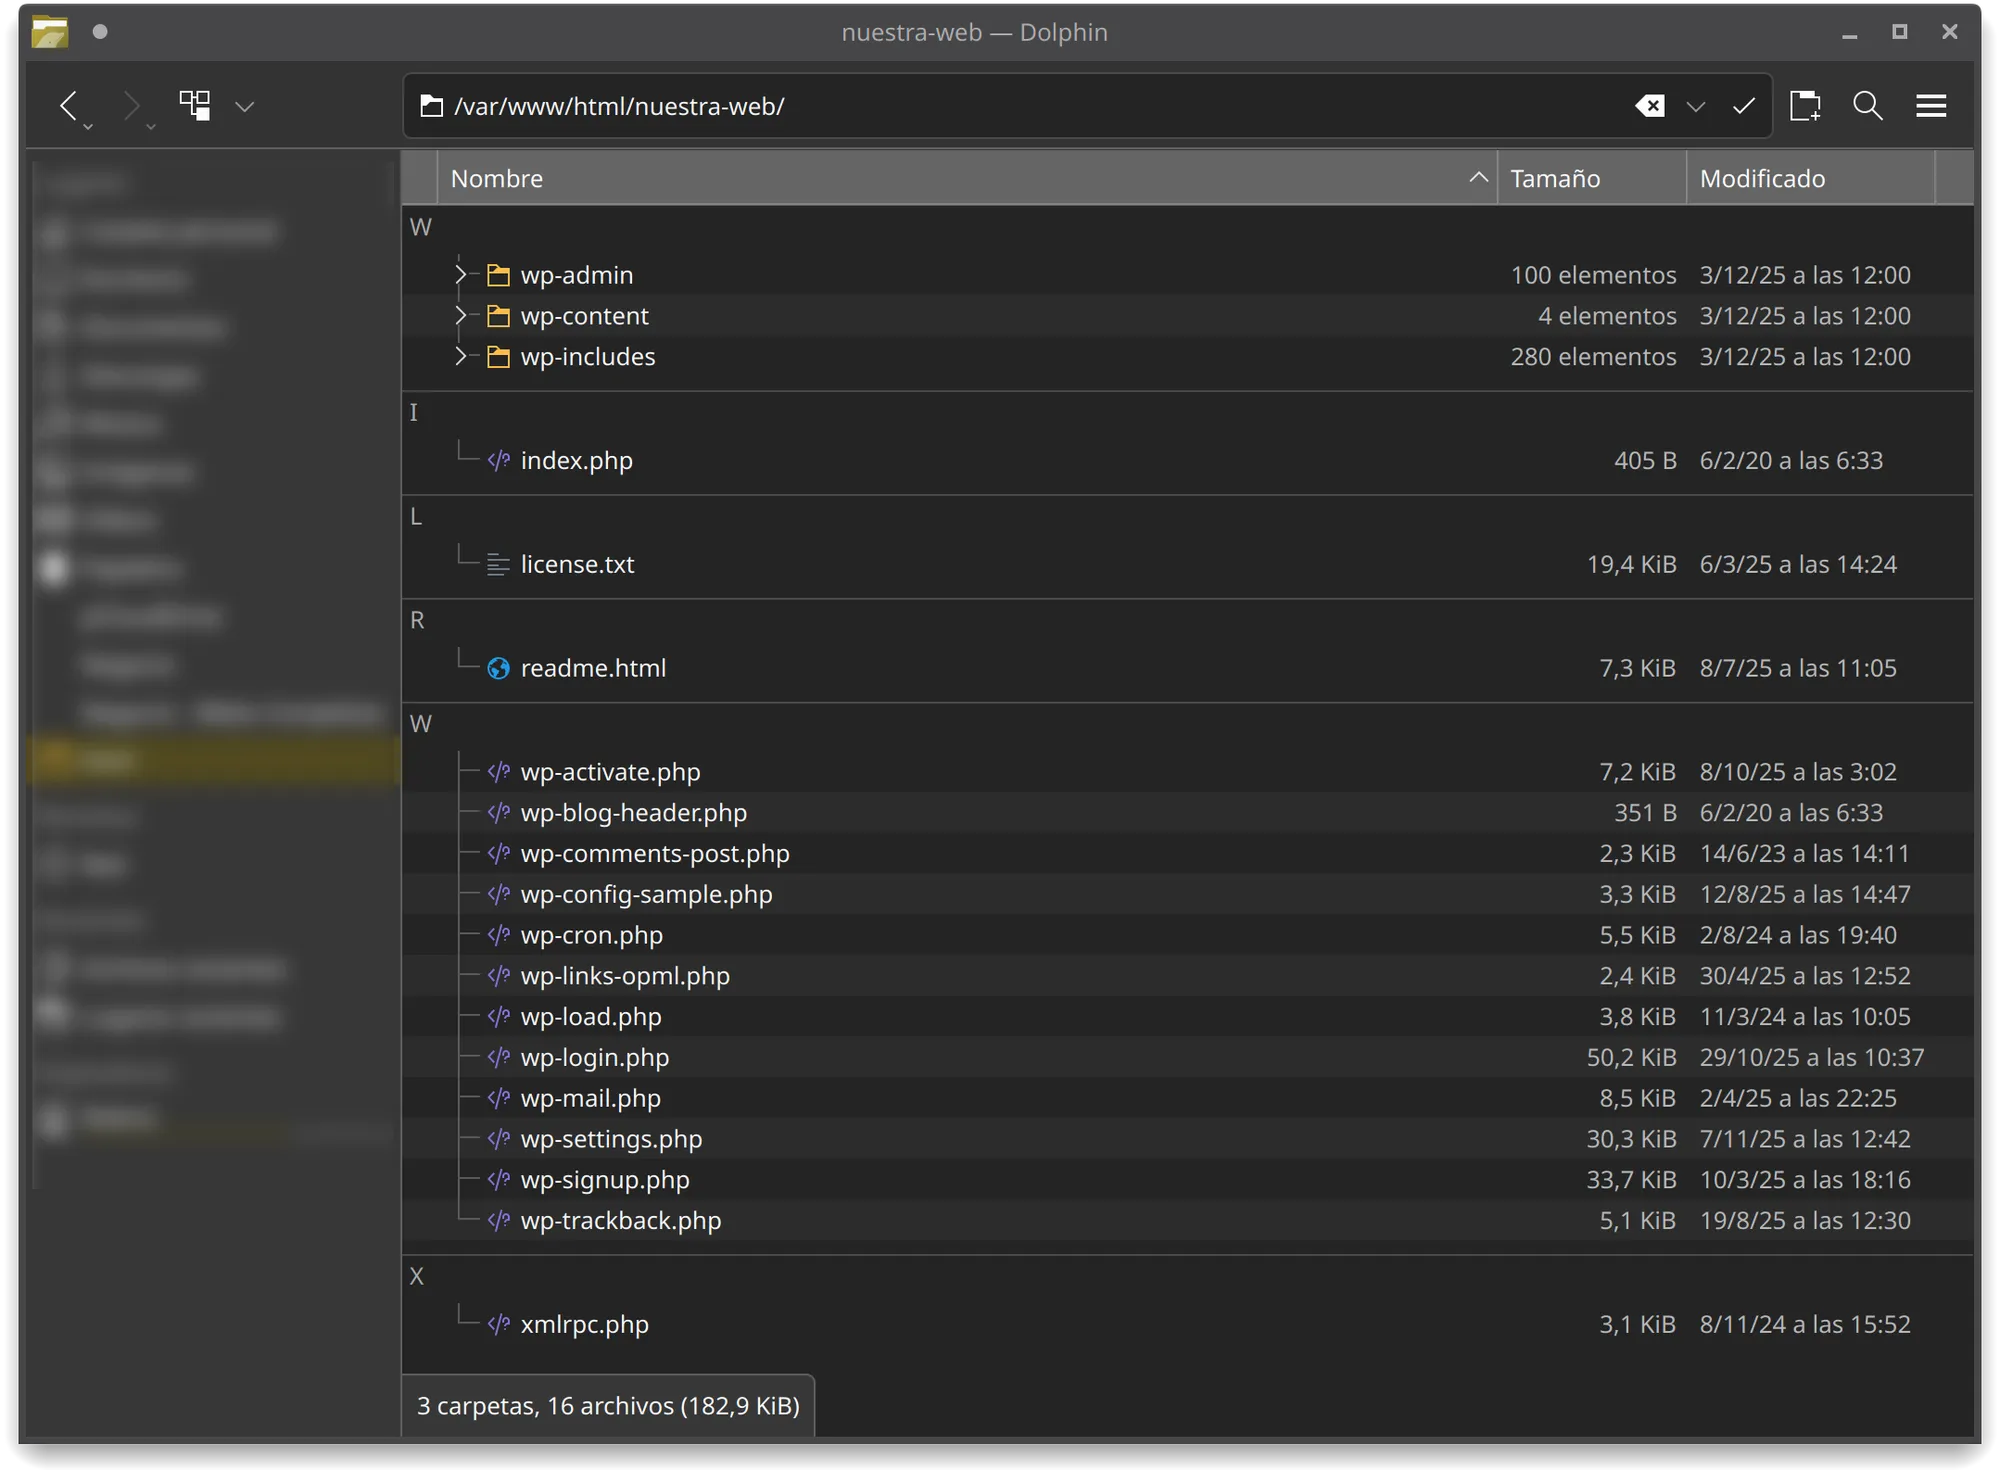
2️⃣ What do we do with the downloaded .zip file? 📂
Now go to the local folder where your websites are stored. Depending on the local server you use, it may be:
- XAMPP:
C:\xampp\htdocs\nuestra-web\ - WAMP:
C:\wamp64\www\nuestra-web\ - LAMP:
/var/www/html/nuestra-web/
Inside this “nuestra-web” folder (we create it because it does not exist yet), extract the contents of the WordPress .zip file, resulting in:
3️⃣ Run the local server (XAMPP, WAMP or LAMP) ▶️
Open your local server on your computer and enable the required services:
- ✅ Apache
- ✅ PHP
- ✅ phpMyAdmin
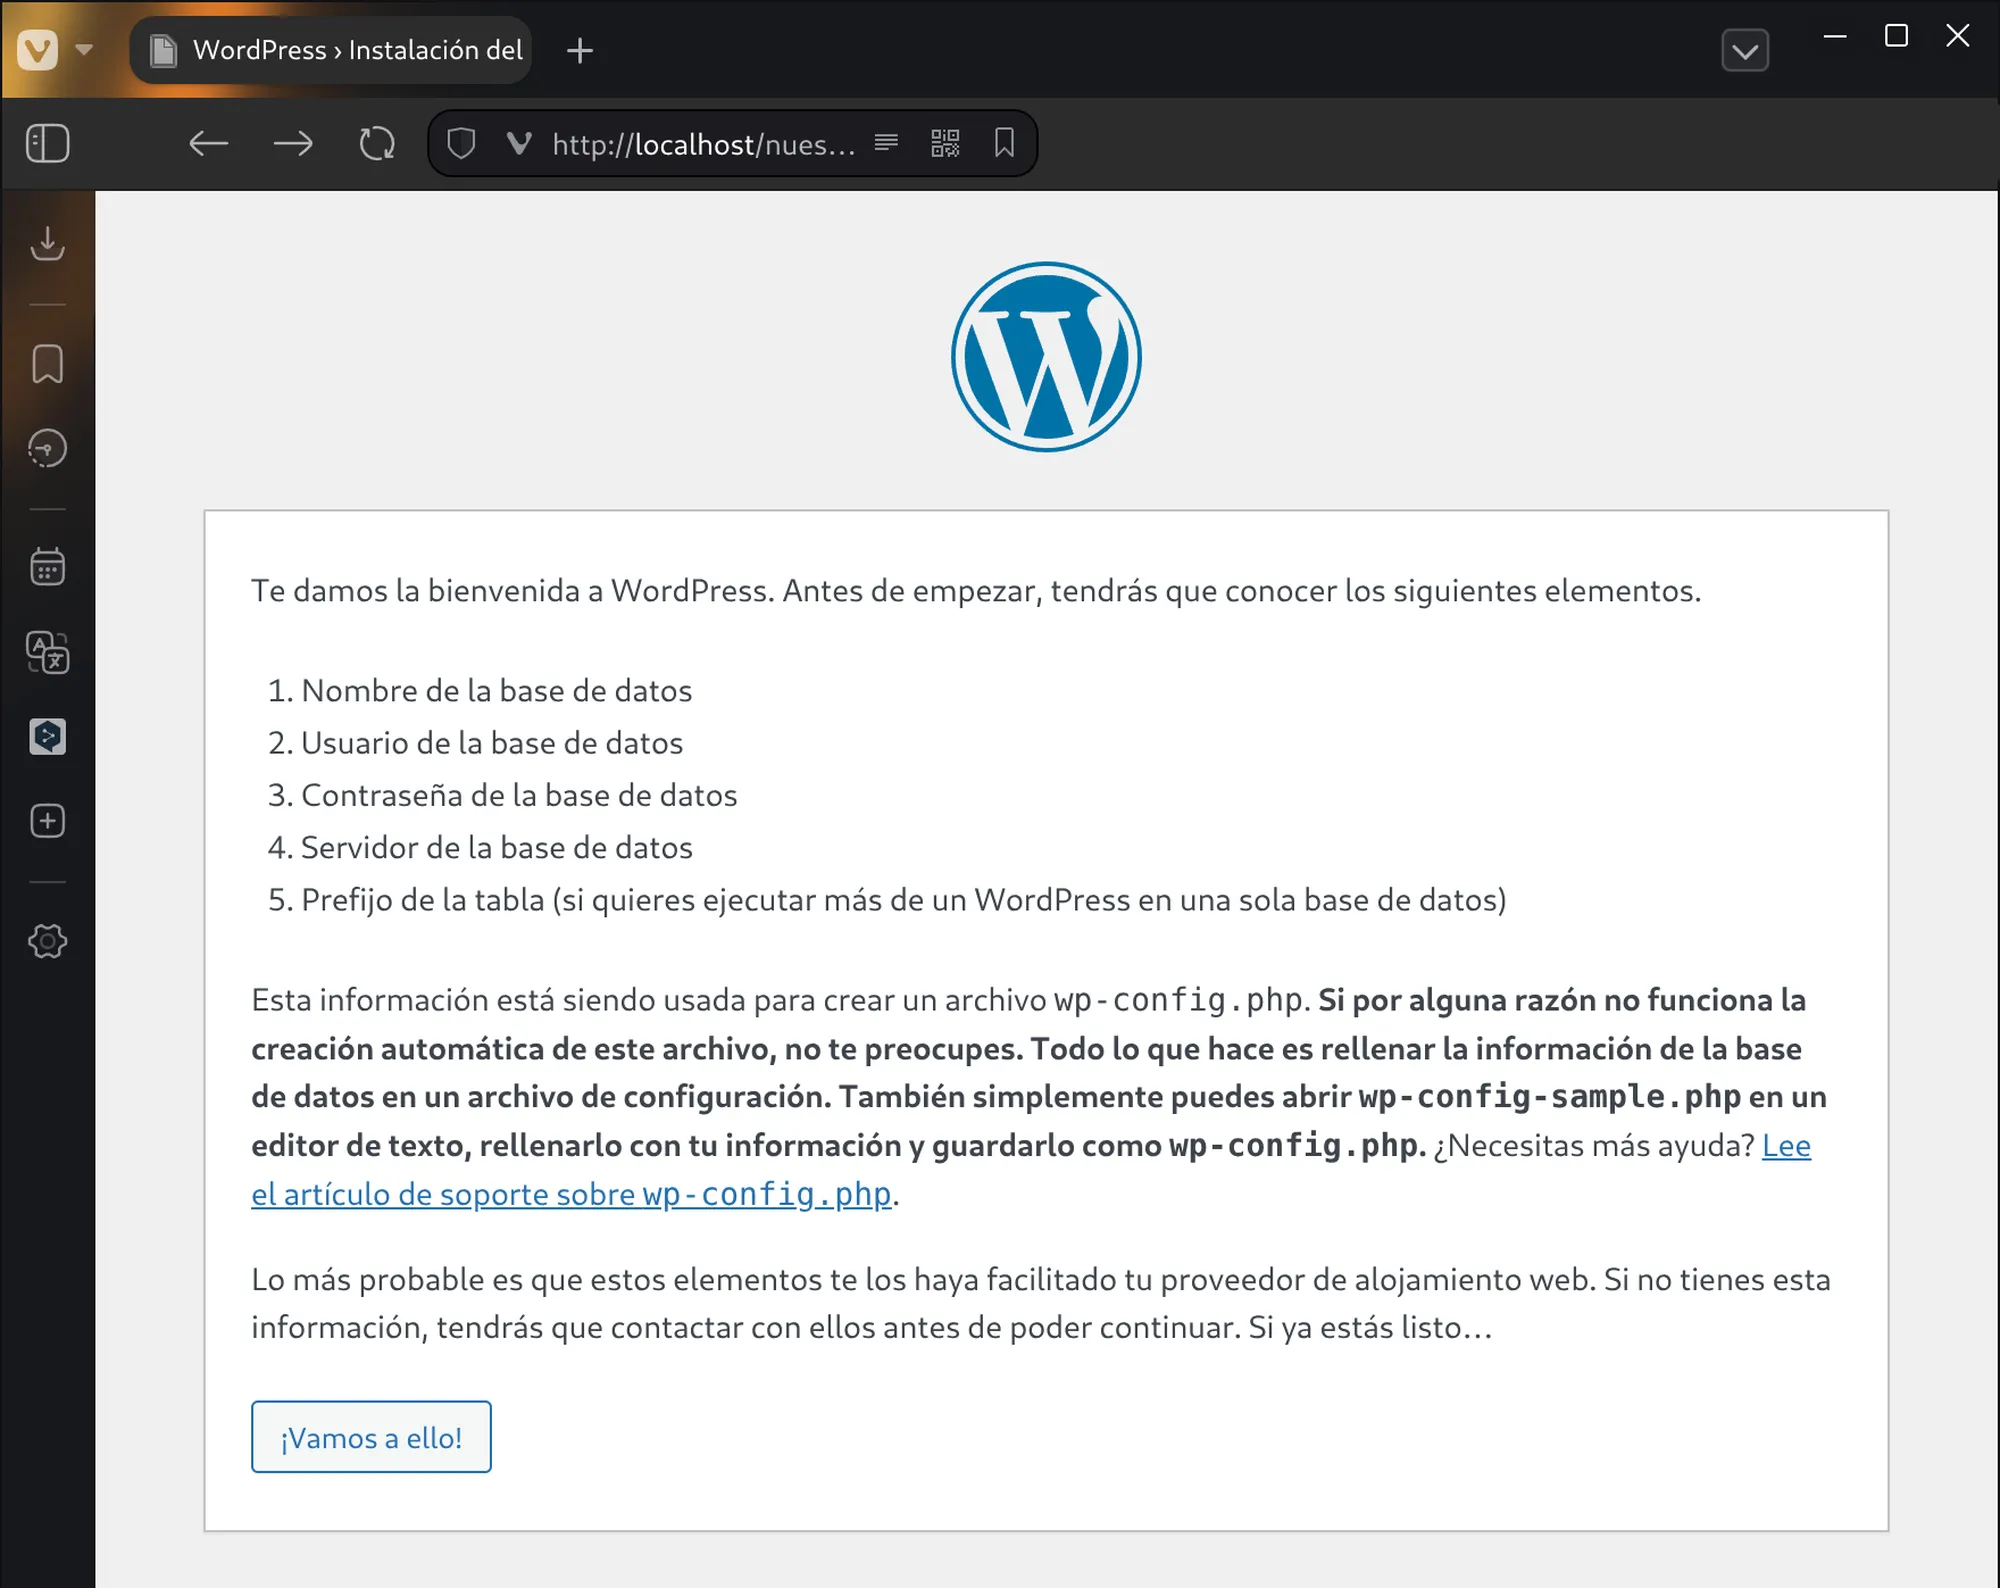
4️⃣ Start the WordPress installation 🌐
Open your browser and type:
👉 http://localhost/nuestra-web
Since the wp-config.php file does not exist yet (this file stores the database connection details), WordPress will detect a new installation and automatically redirect you to:
👉 http://localhost/nuestra-web/wp-admin/setup-config.php
Read the instructions and click the “Let’s go!” button.
5️⃣ Database connection 🗄️
WordPress will ask for the following information:
- Database name
- Username
- Password
- Database host (usually
localhost) - Table prefix (default is
wp_, recommended to change it for security)
Create the database in phpMyAdmin
Open a new browser tab and go to:
👉 http://localhost/phpmyadmin/
Enter the username and password (leave it blank if no password was set) and click “Log in”.

Once logged in, click “New” in the left menu.

Enter the database name, for example:
👉 nuestrawebdb
In the collation dropdown select:
👉 utf8mb4_general_ci
This allows the use of special characters (accents, symbols, emojis 😄) and ensures compatibility with all languages. It is located at the bottom of the list.
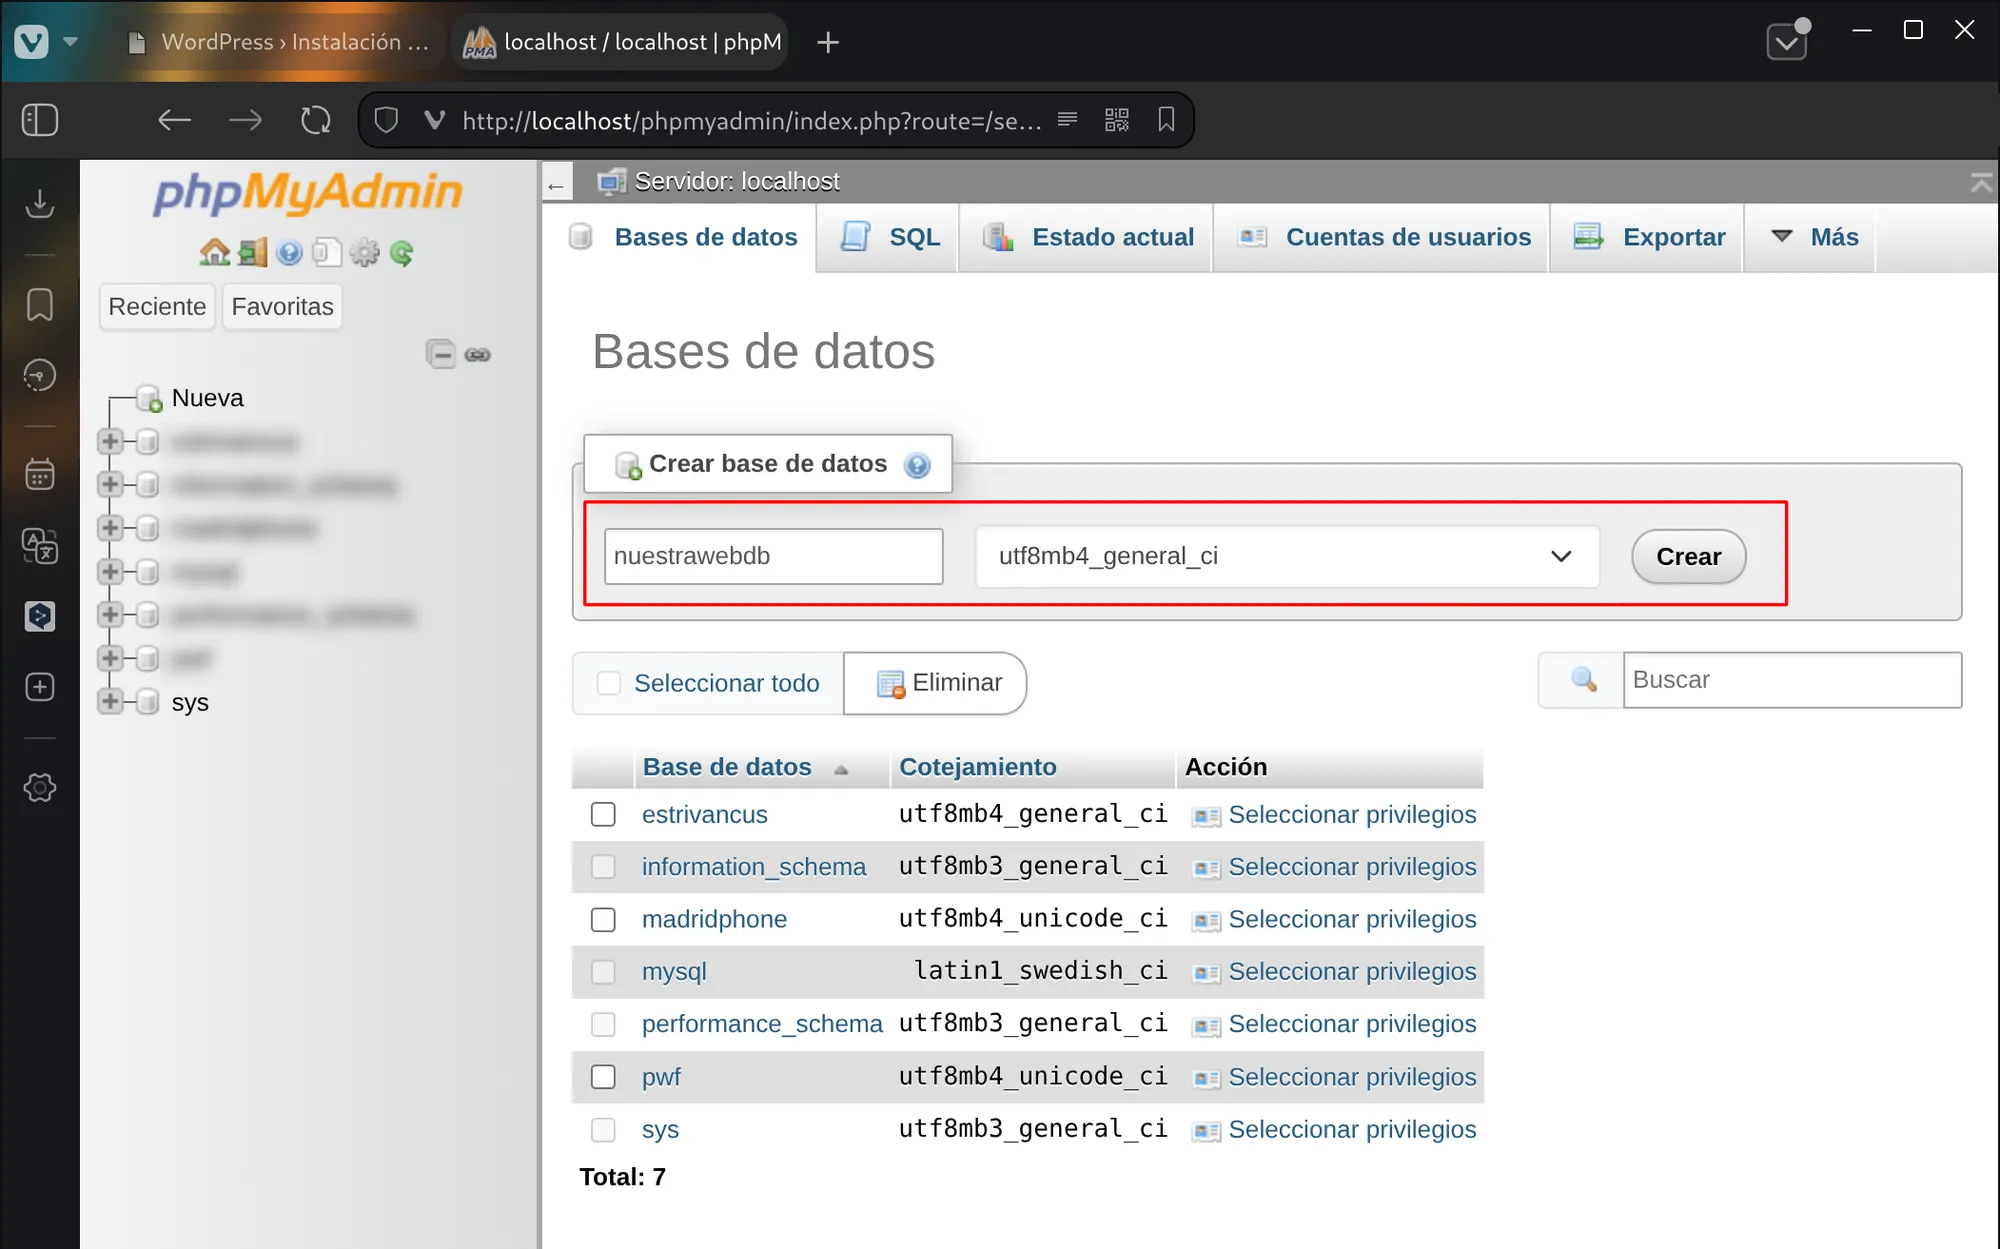
Click “Create”.

The database is now created and you can close this tab.
6️⃣ Continue with the WordPress installation ⚙️
Go back to the WordPress tab and fill in the details:
- Database: nuestrawebdb
- Username: root
- Password: (yours or blank if none)
- Server: localhost
- Table prefix: wpnw_
💡 Tip: changing the prefix (wpnw_) improves security. You can use your website initials or any custom value, but never leave it as wp_.
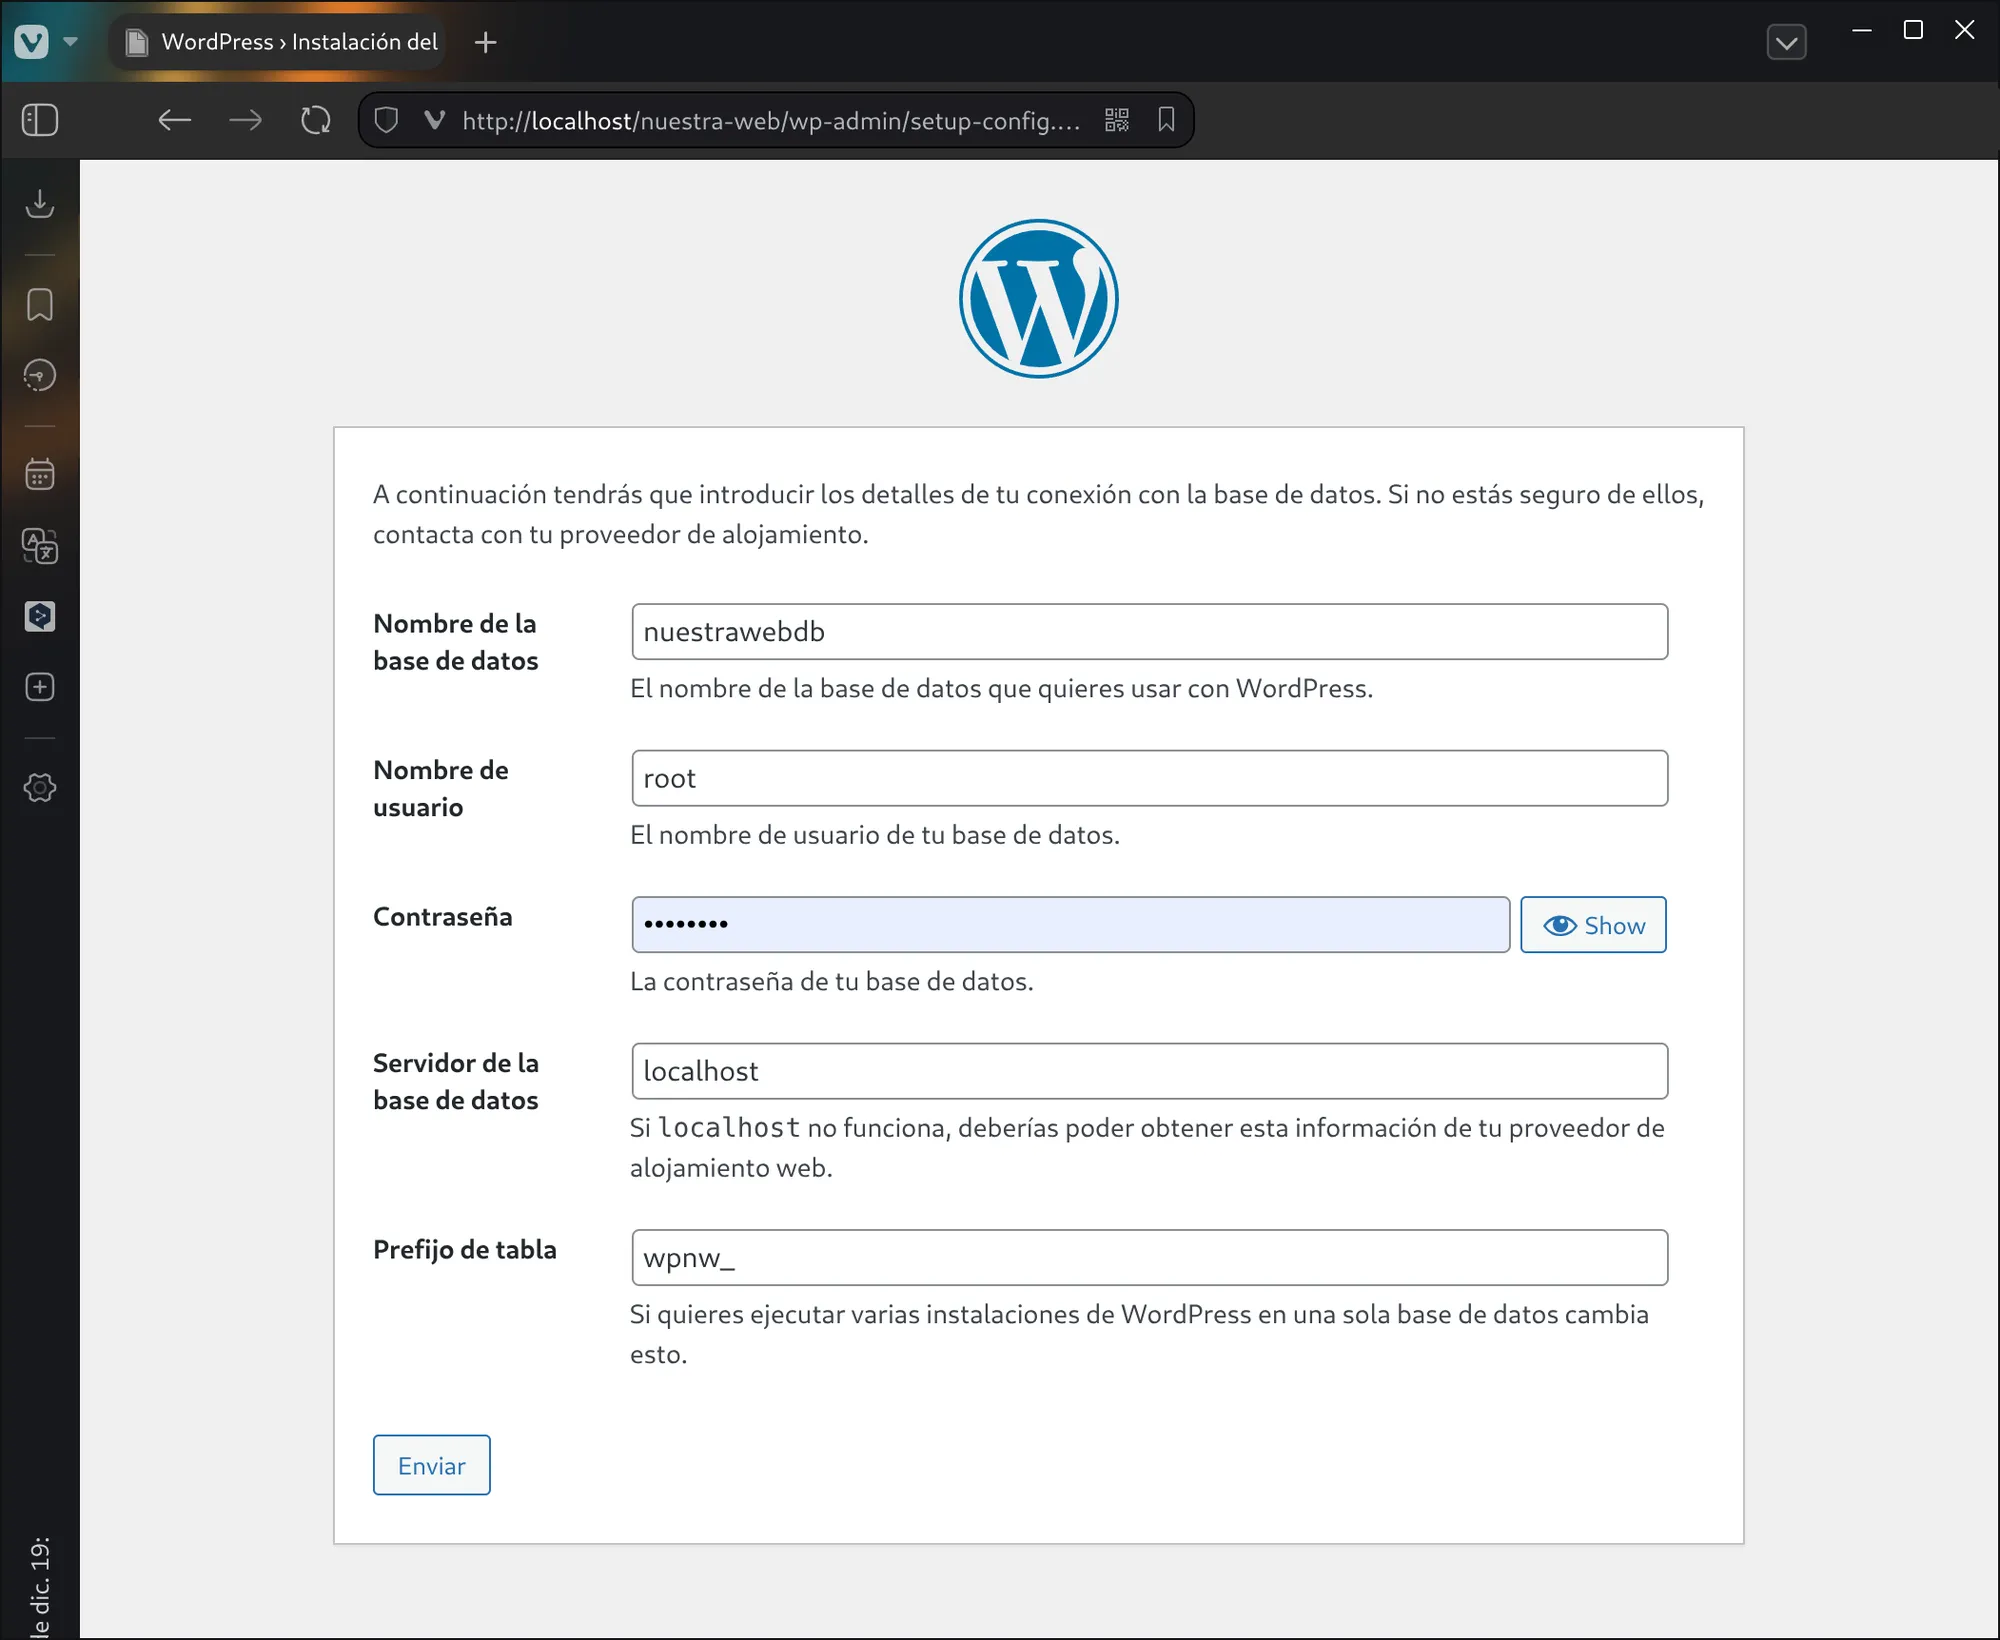
Click “Submit”.
7️⃣ Install WordPress 🚀
If the connection is correct, you will see the final installation screen.
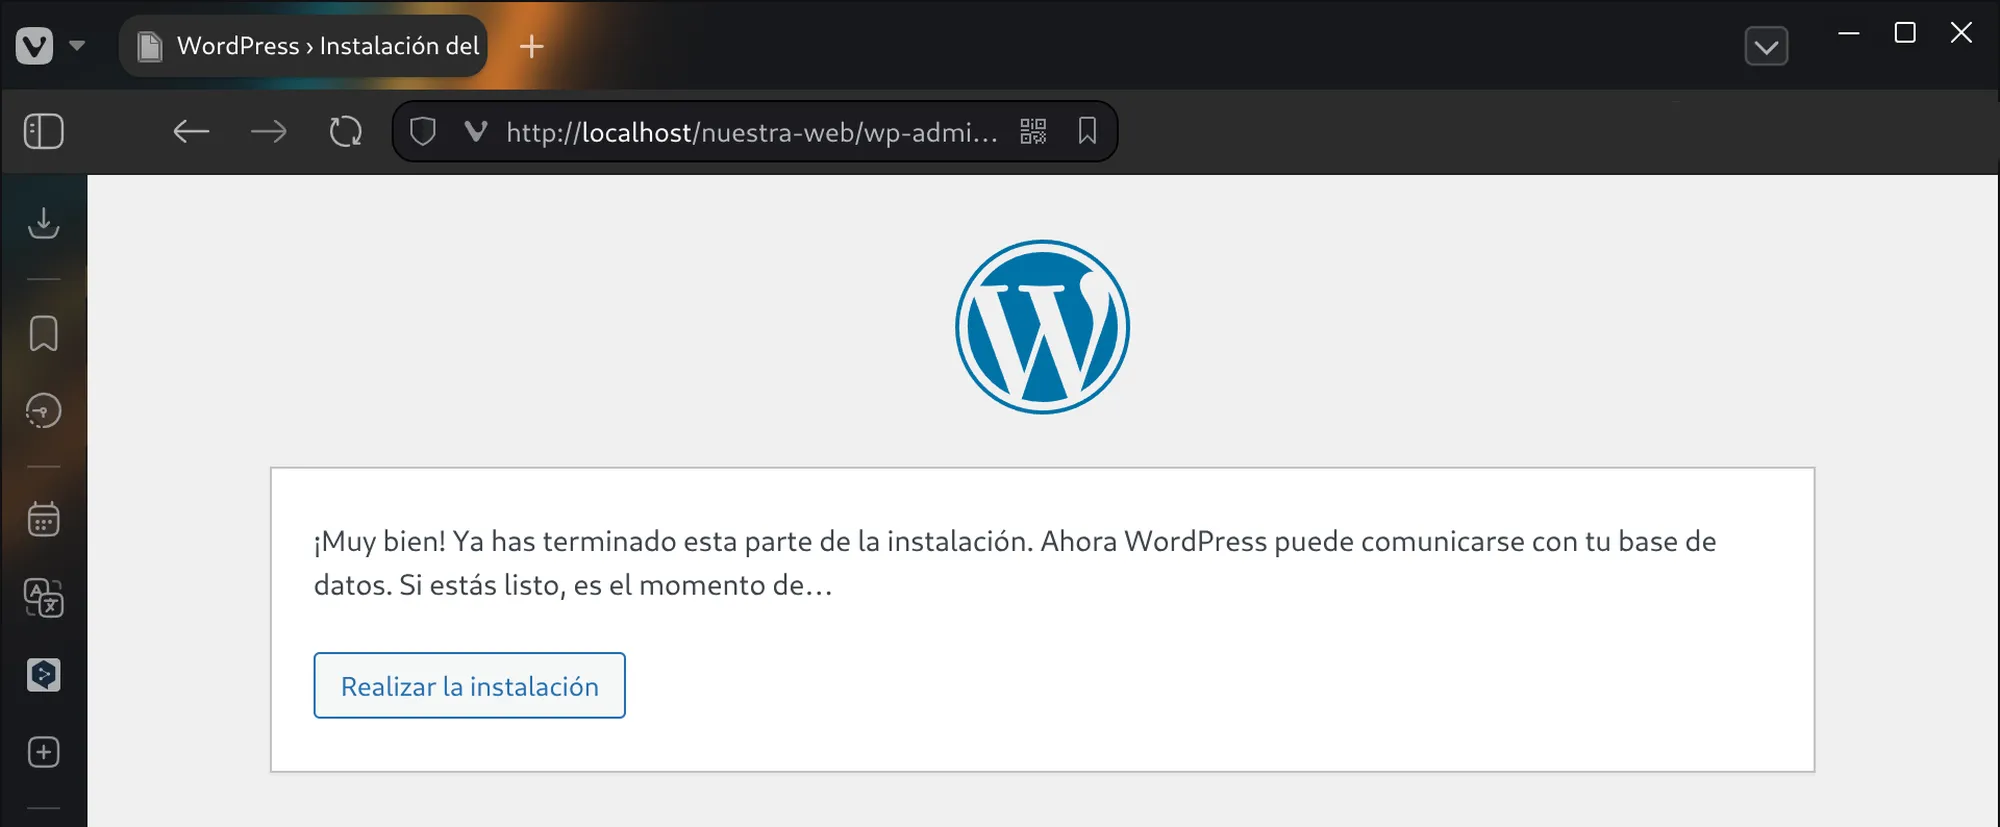
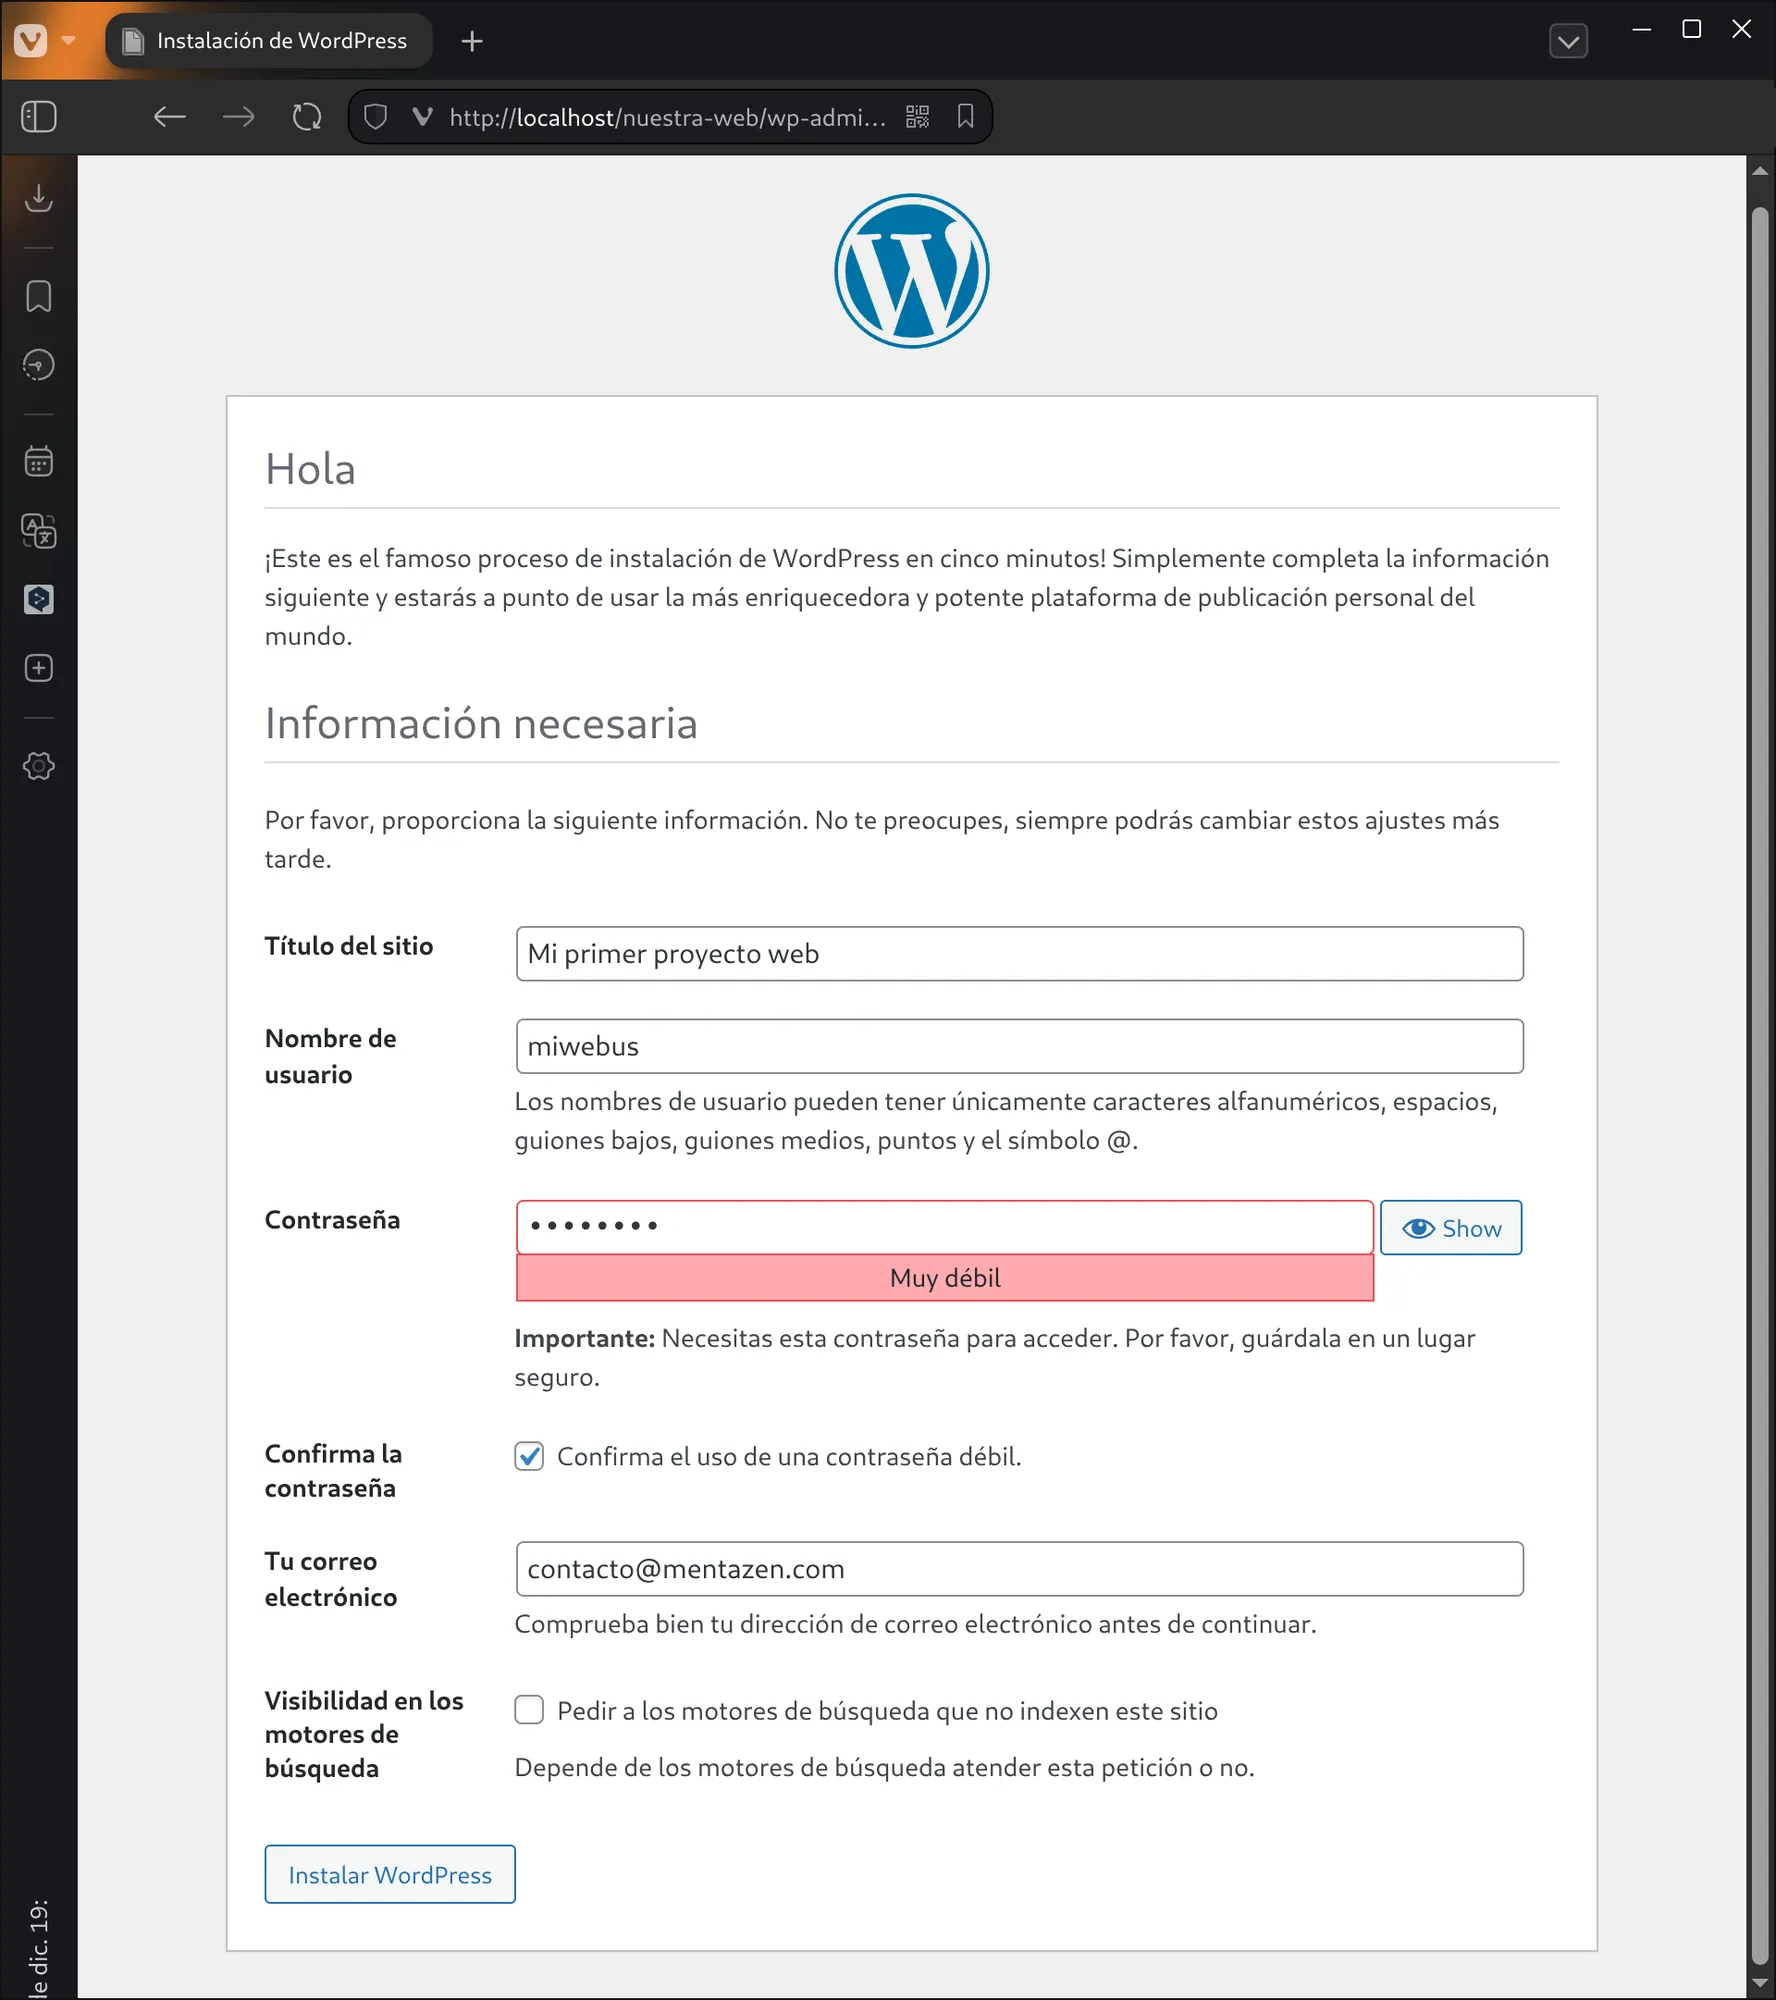
Click “Run the installation” and fill in:
- Site title: will appear in the browser tab.
- Username: administrator user for the WordPress dashboard.
- Password: administrator password.
- Confirm password: requires uppercase, lowercase, and special characters, but for testing you can use any password.
- Email address: WordPress admin notifications will be sent here.
- Search engine visibility
- ❌ Uncheck if the site is already public.
- ✅ Check if it is under construction.
Click “Install WordPress”.
8️⃣ WordPress installed successfully! 🎉
A message will appear indicating that WordPress has been installed successfully.
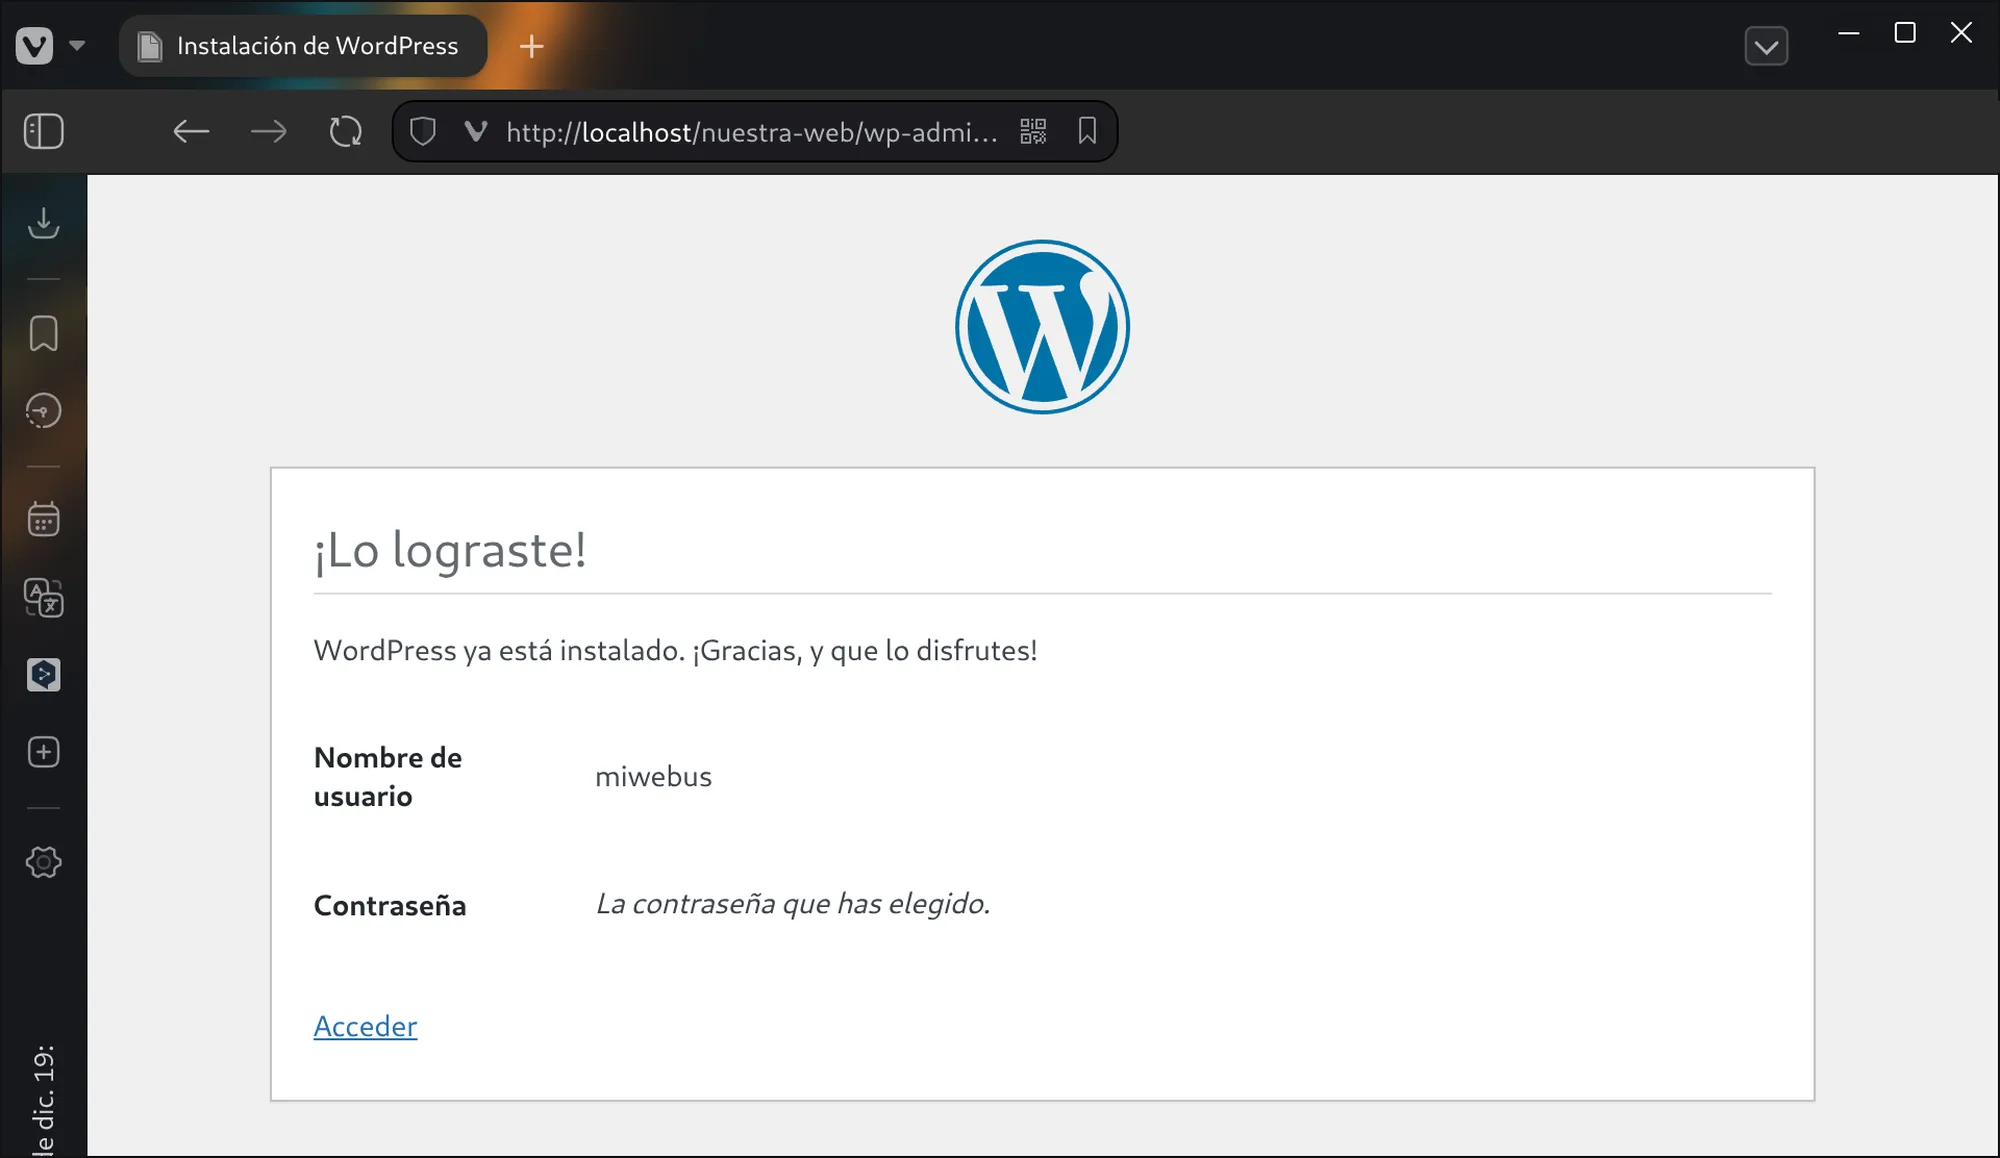
You can access the WordPress admin panel from two addresses:
👉 http://localhost/nuestra-web/wp-admin
Or…
👉 http://localhost/nuestra-web/wp-login.php
Enter the username and password you created.
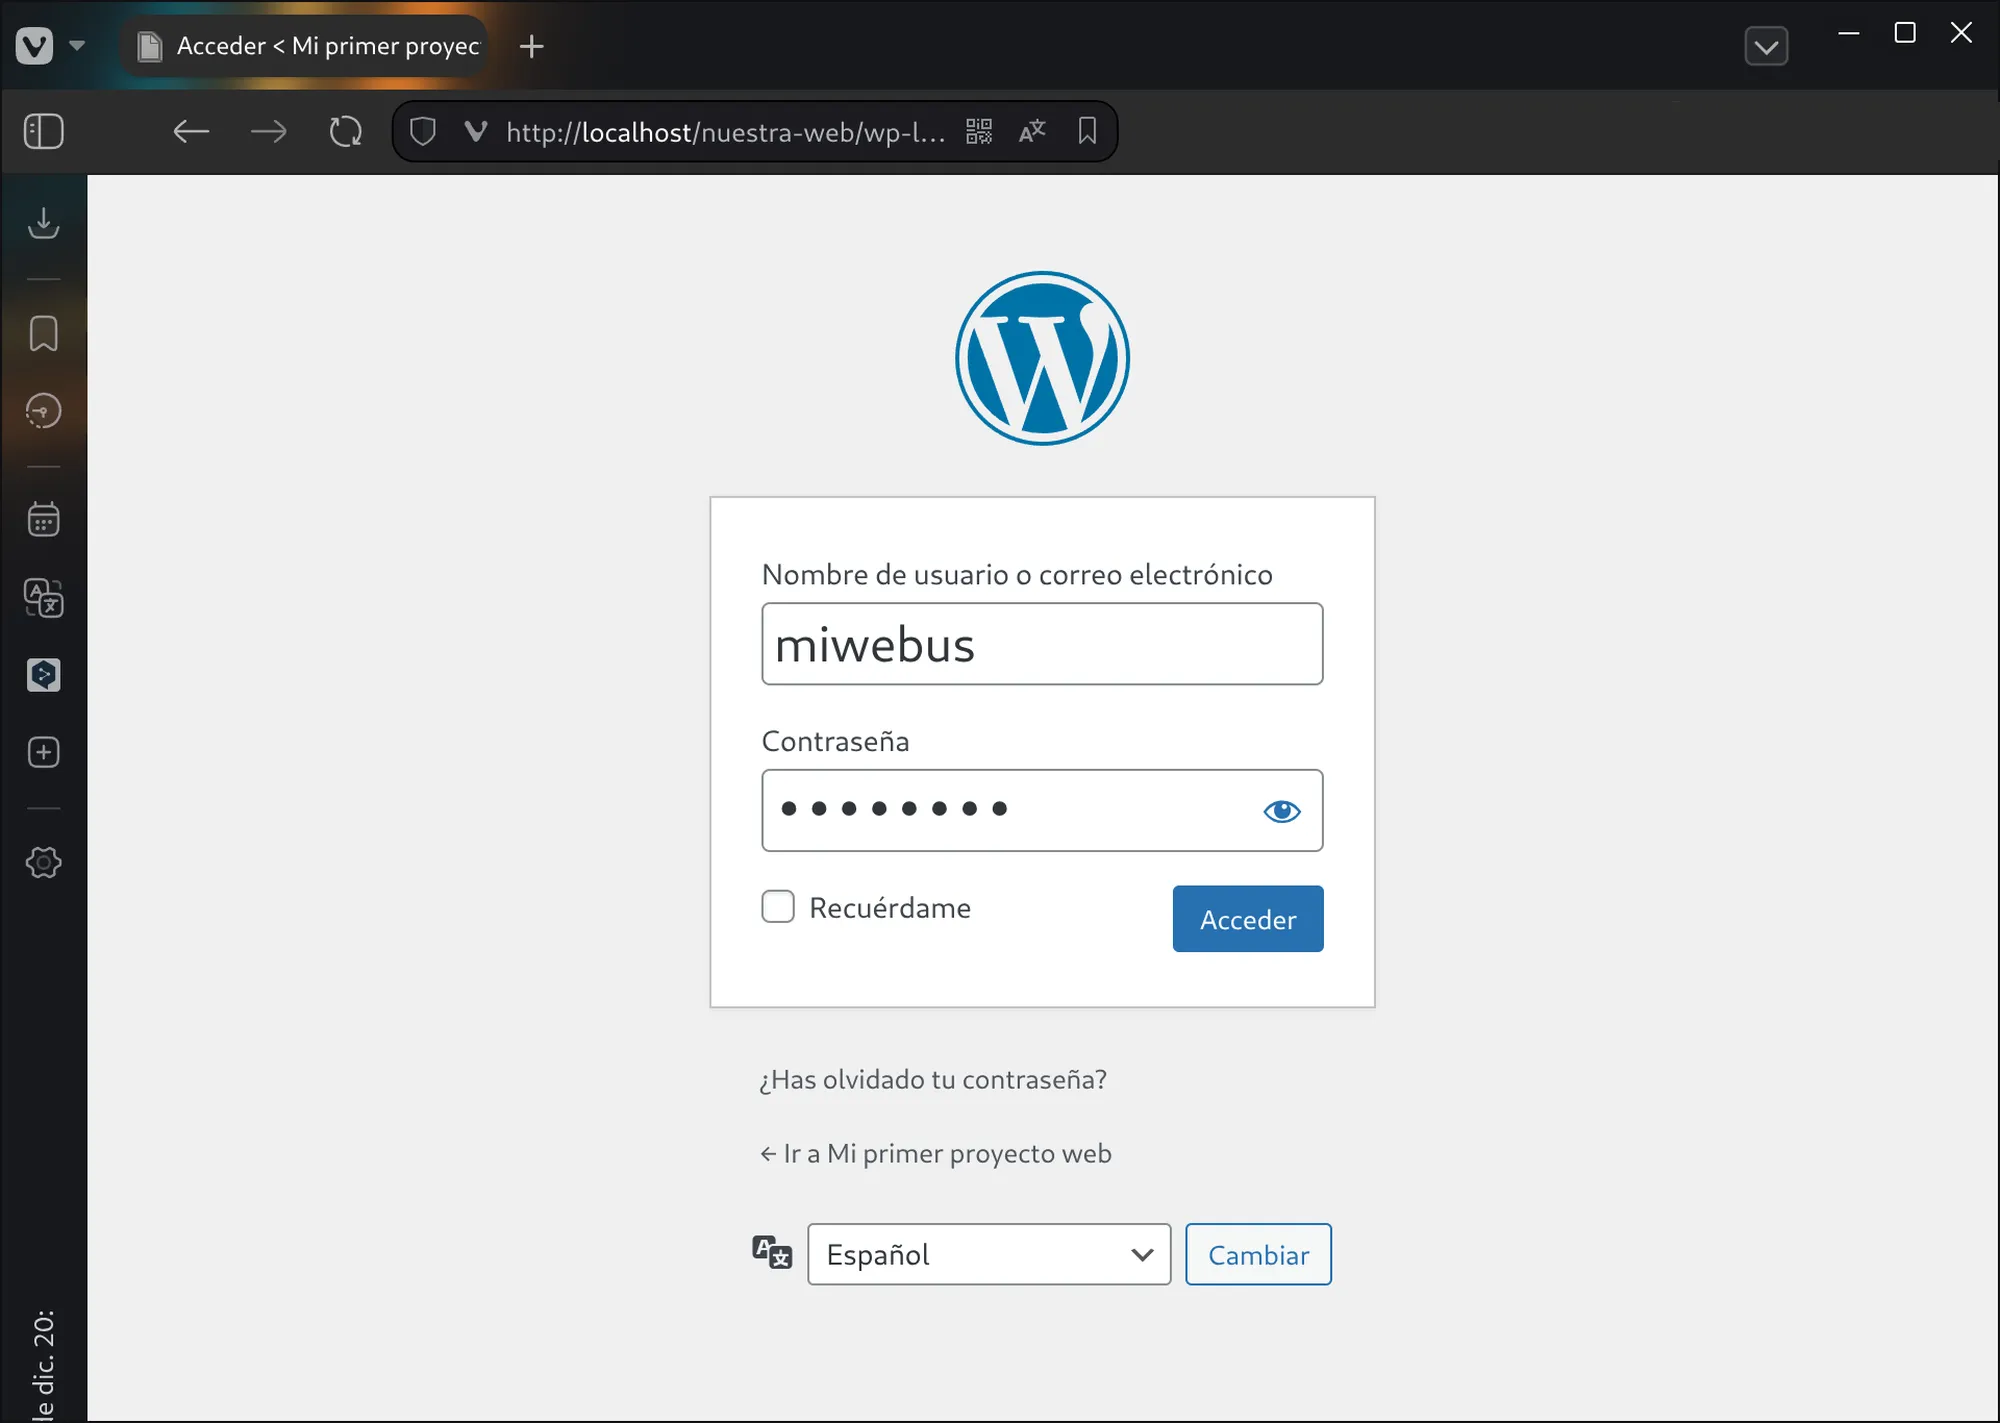
Click “Log in”.
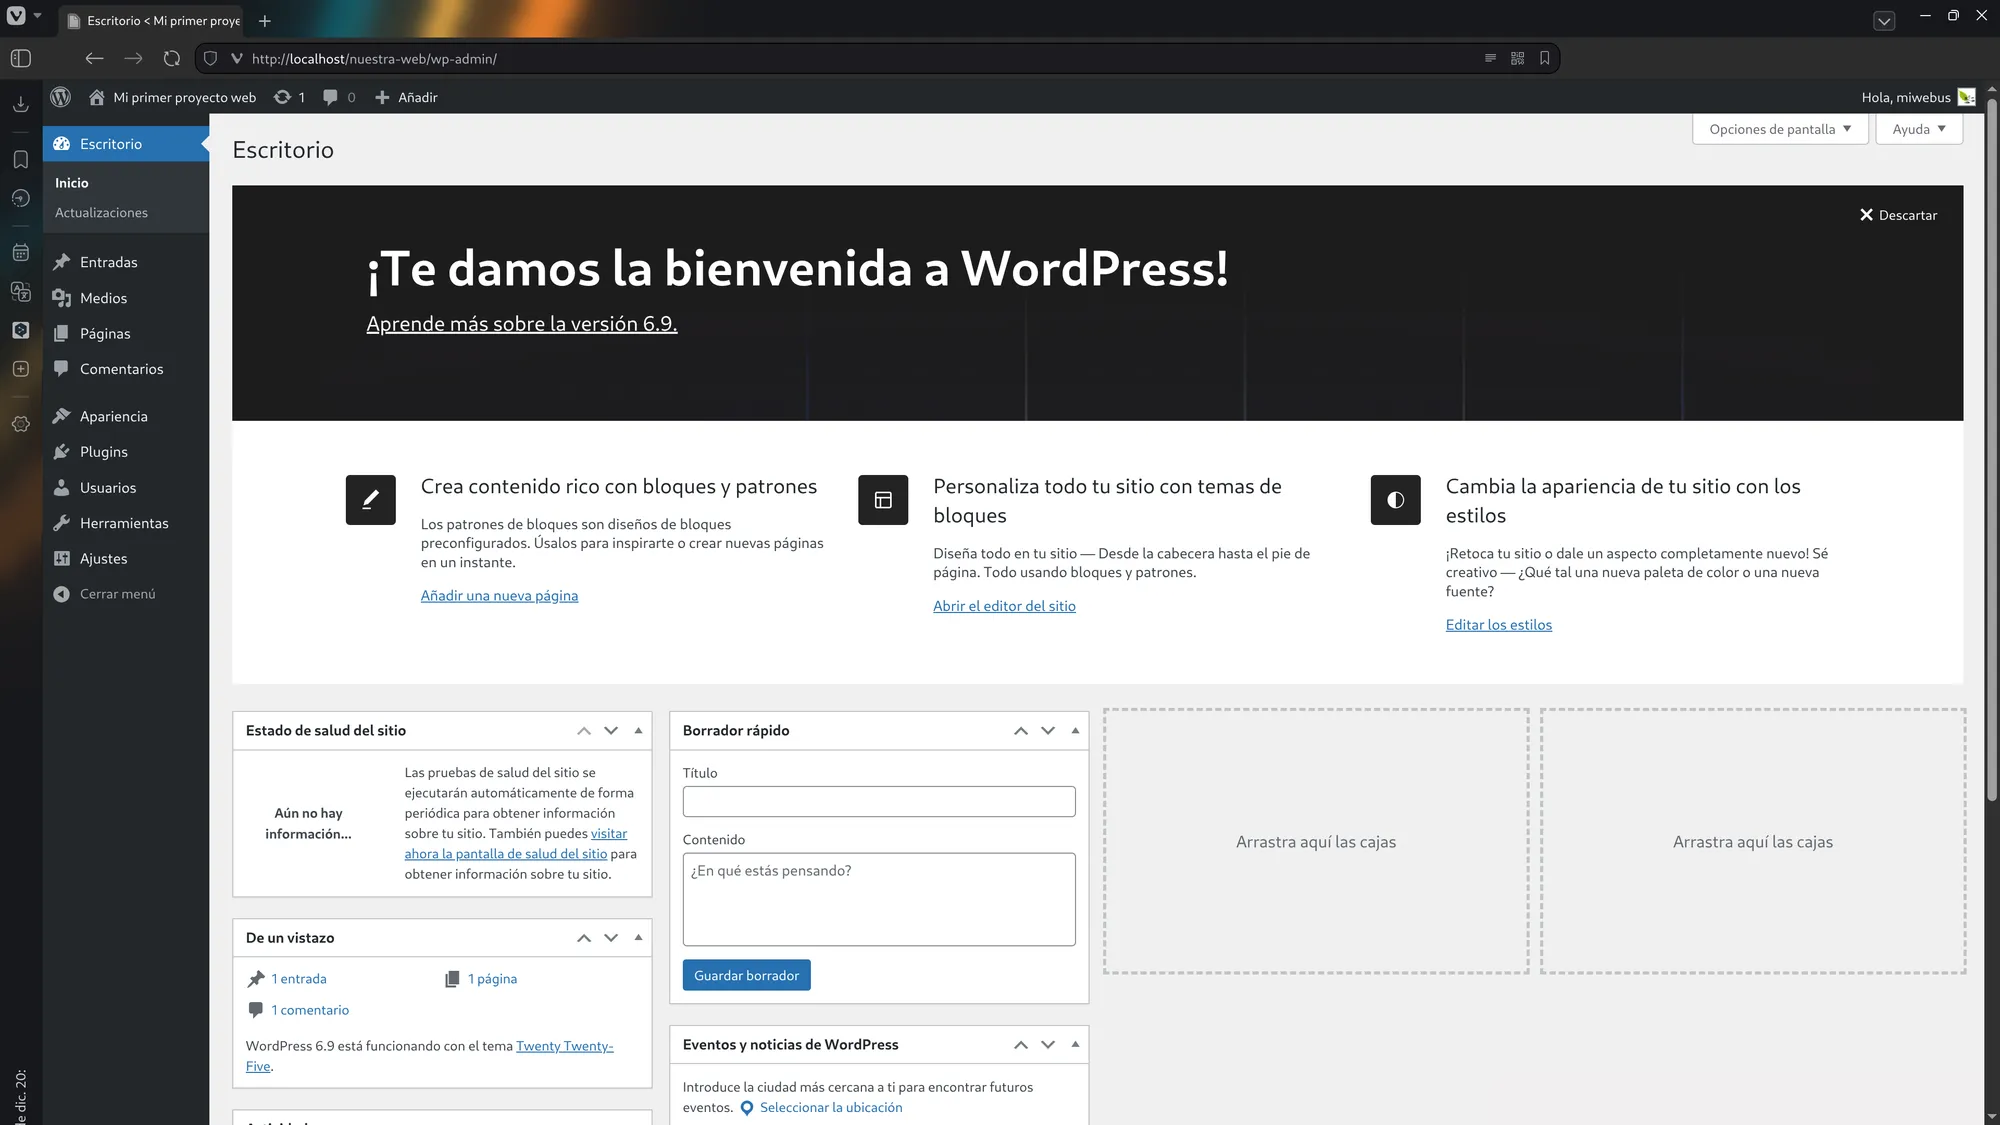
You will be taken to the main screen of the administrator dashboard.
9️⃣ Access the public part of the website 🌍
If you type in the browser:
👉 http://localhost/nuestra-web/
You will see the public part of your website, exactly as users will see it.
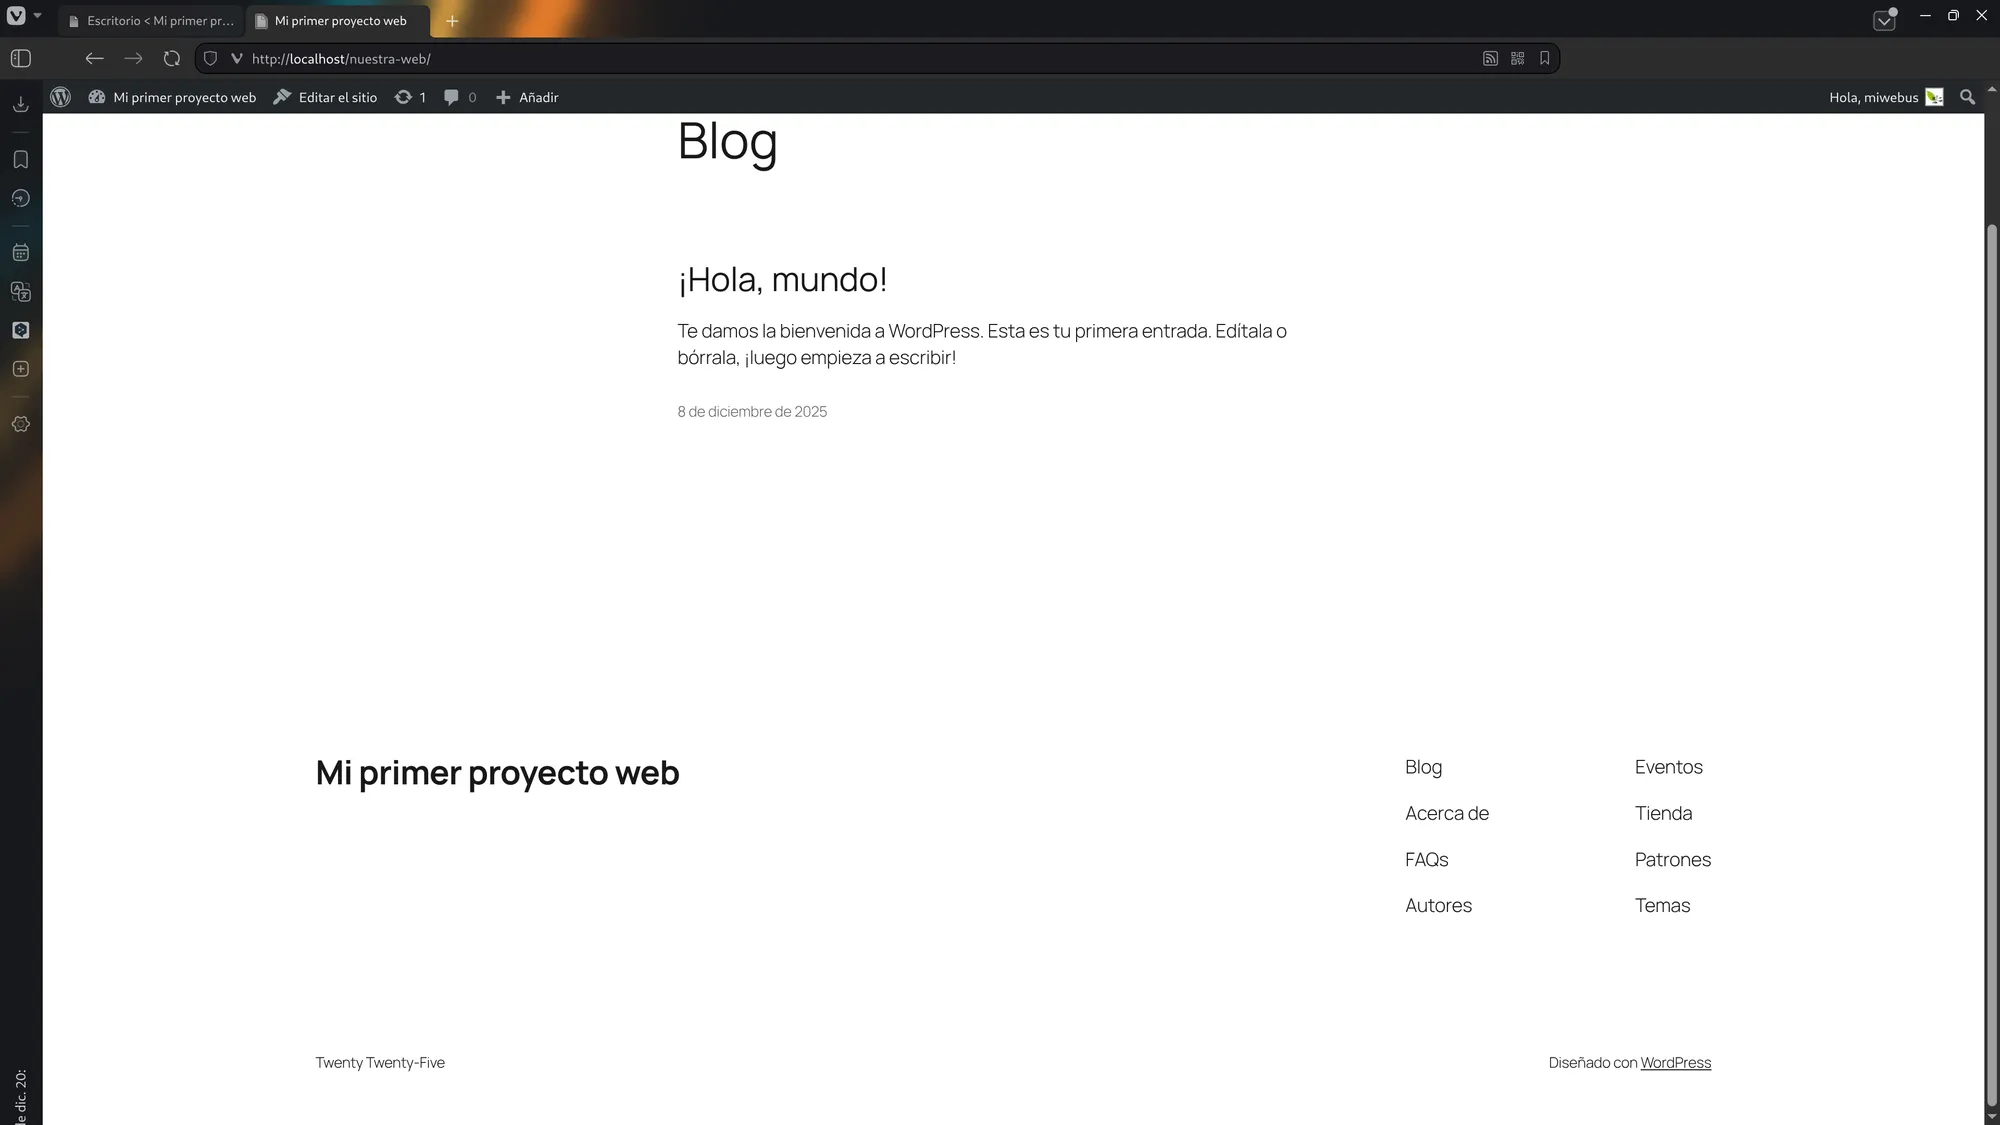
⚠️ The design and some options may vary depending on the WordPress version installed.
✅ Conclusion
Done! 🎯
You now have WordPress installed on your local server, perfect for learning, practicing, and developing offline before uploading your website to the internet.